Sinterklaas kapoentje
gooi wat in mijn schoentje,
gooi wat in mijn laarsje
Dank u, Sinterklaasje.
I remember that song!
It's the song that Kris Kringle (Edmund Gwenn)
sings with the little Dutch girl in the 1947 movie, "Miracle on 34th Street"!
I have met so many wonderful friends from many countries
during the time I have spent on the internet.
One of my new friends is a sweet lady from The Netherlands
and I have recently learned some interesting Christmas traditions from that country.
St Nicholas arrives early in Holland with his gifts, in November.
He is dressed in Bishop's robes and journeys in a boat with his helper who is called Zwarte Piet.
My friend makes a super Zwarte Piet! *big grin*
Many people go to Amsterdam docks to greet him.
He rides a white horse through the streets in a great parade, amid many festivities.
December 5th is Sinterklass Eve, when the children put out their shoes,
filled with a carrot or hay for Sinterklaas' horse, and await the morning.
Sinterklaas then fills the shoes of all the children with sweets,
especially chocolate letters, and gifts.
Chocolate letters are also exchanged between friends
during the Christmas season in The Netherlands.
I hope you will enjoy making some chocolate letters to share with your friends
and will also enjoy Vera's Christmas Pages too!
Merry Christmas!
*knuffels* Auntie Em
~~~~~~~~~~~~~~~~~~~~~~~~~~~~~~~~
Please read my **TERMS OF USE** before doing this tutorial.
Thanks! Auntie Em
This tutorial assumes you have a basic knowledge
of the workings of Paint Shop Pro.
You will also need Eye Candy 3 for this tutorial.
Bring up a blank image form, transparent background, size 400 X 400 pixels in size.
Floodfill with white.
Add a new raster layer.
Set your foreground color to 461A1A (a dark brown) and background set to 5E2F05
Turn off your foreground color and use your Text tool…Floating and Antialias checked
to place the letter you want to make (using the lighter brown) on the canvas.
For my letters, I used the font Rockwell Extra Bold size 200.
Leave selected.
Add a new raster layer.
Turn your foreground color back on.
Use your Airbrush Tool to spray on the foreground color in random “squiggles”
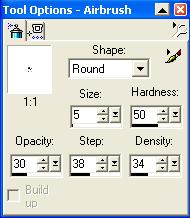
Add these mainly in the middle of the letter.
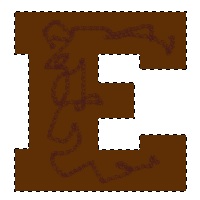
Now, go to Effects > Geometric > Twirl > -395 (negative 395)

Then go to Effects > Geometric > Wave
Horiz. displacement: Amplitude and Wavelength both at 2
Vertical displacement….Amplitude 12 Wavelength 100

Then use Effects…Blur…Gaussian Blur…2

Selections > Select None.
Turn off the white background layer and merge visible layers.
You can turn on your white background layer again.
Duplicate the layer with your letter on it and make sure it’s the “active layer”.
Selections > Select all > Float
Now apply Eye Candy 3 > Swirl > preset “Typical”
If you don't have that particular preset in your Eye Candy 3, then use the following settings:
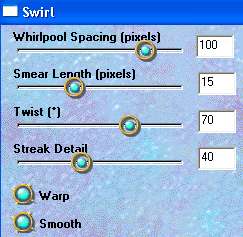
If you have Eye Candy 4000 and would like to use it instead,
just use the Large Whirlpools preset and change the Streak Detail to 75.
You may want to apply this preset to that layer twice.

Selections > Select none.
Set layer properties to Luminance…drop opacity to 35.

Turn off white background layer again and Merge Visible layers.
Go to Effects…3D Effects…Inner bevel with the following settings:
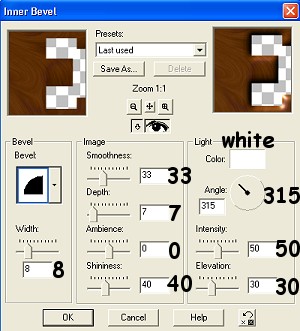
Edit > Copy > Edit > Paste as New Image > File > Export as Picture Tube.
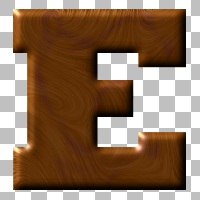
Bring up a new transparent image file 400 X 400 pixels.
Floodfill the background with white and add a new raster layer.
Set the tubed letter in your Tool Options for Scale 100, Step Size 1, Continuous and Incremental.
Apply the tube by holding down left mouse button as you apply it and drag it slightly downward and to the right.
It may take several tries to get a nice smooth, thick edge to your letter.
Don’t worry if you have some “jaggy-looking” edges. I’ll show you how to fix that.
Enlarge your chocolate letter so that you can see those angles with the jaggy edges.
Use your Freehand Selection Tool set on Point to Point…feather 0….antialias checked
Surround that edge and hit delete or cut.
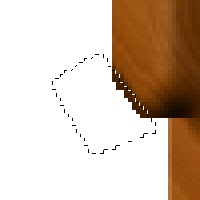
Do this with any of the corners that need straightening.
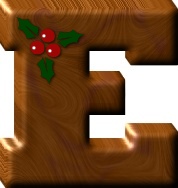
Now you have a nice three dimensional chocolate letter to tube or to give to your friends!
*Vrolijk kerstfeest* to you!

Home
tutorial and graphics © Auntie Em 2001-2007


